 NeoBit Daily
Introduction to Snapseed in 2026
Snapseed remains one of the most powerful free mobile photo editing apps available in 2026. Developed by Google, it offers professional-grade tools that rival desktop software while remaining intuitive for smartphone users. This guide provides practical walkthroughs for core features including curves, healing, and selective adjustments, helping you elevate your images quickly on iOS or Android devices. Photographers worldwide rely on Snapseed for its non-destructive editing approach, allowing unlimited experimentation without fear of permanent changes to original files.
Whether you're a beginner looking to move beyond basic filters or an advanced user seeking creative effects, Snapseed delivers flexibility without subscriptions. We'll compare it to built-in phone editors, share batch processing tips, and cover exporting best practices for optimized files. Real-world examples will demonstrate how these tools transform ordinary snapshots into polished images suitable for social media, portfolios, or prints.
Getting Started with Snapseed
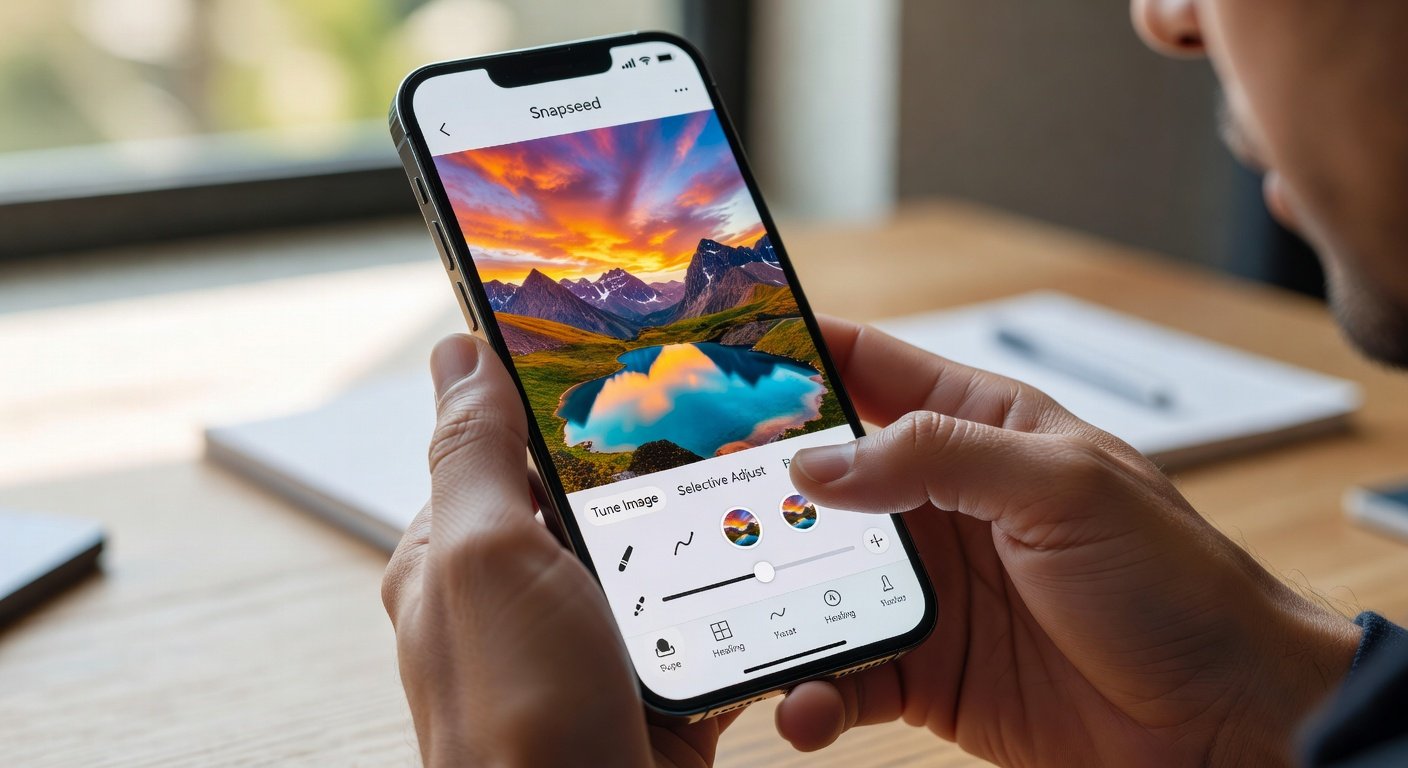
Download Snapseed from official app stores and open your first image. The interface features a clean workspace with tools accessible via the bottom menu. Start by importing a photo from your camera roll or capturing one directly in the app. Familiarize yourself with the undo and compare buttons to toggle between edited and original versions instantly. This feature proves invaluable during complex edits where subtle changes accumulate.
Core Tools Overview
Key tools include Tune Image for basic exposure and contrast, Curves for precise tonal control, Healing for removing unwanted objects, and Selective for targeted adjustments. Each tool offers real-time previews, making experimentation easy. Additional tools like Brush, Healing, and Perspective provide further refinement options for architectural shots or product photography.
Step-by-Step: Using Curves for Professional Tonal Control
Curves allow you to adjust brightness, contrast, and color balance with precision. Tap the Curves tool and select the RGB channel to modify overall tones or individual color channels for creative grading. This tool is especially effective for correcting exposure issues in high-contrast scenes such as backlit portraits or dramatic sunsets.
- Open your photo and select Curves.
- Drag points on the curve line to lift shadows or deepen highlights.
- Switch to red, green, or blue channels for color correction.
- Apply subtle S-curves for enhanced contrast without clipping details.
- Save your custom curve as a preset for reuse on similar lighting conditions.
For example, editing a landscape at golden hour often benefits from lifting the lower curve slightly to recover shadow details while preserving vibrant skies. Advanced users can combine Curves with the White Balance tool to neutralize color casts from artificial lighting in indoor event photography.
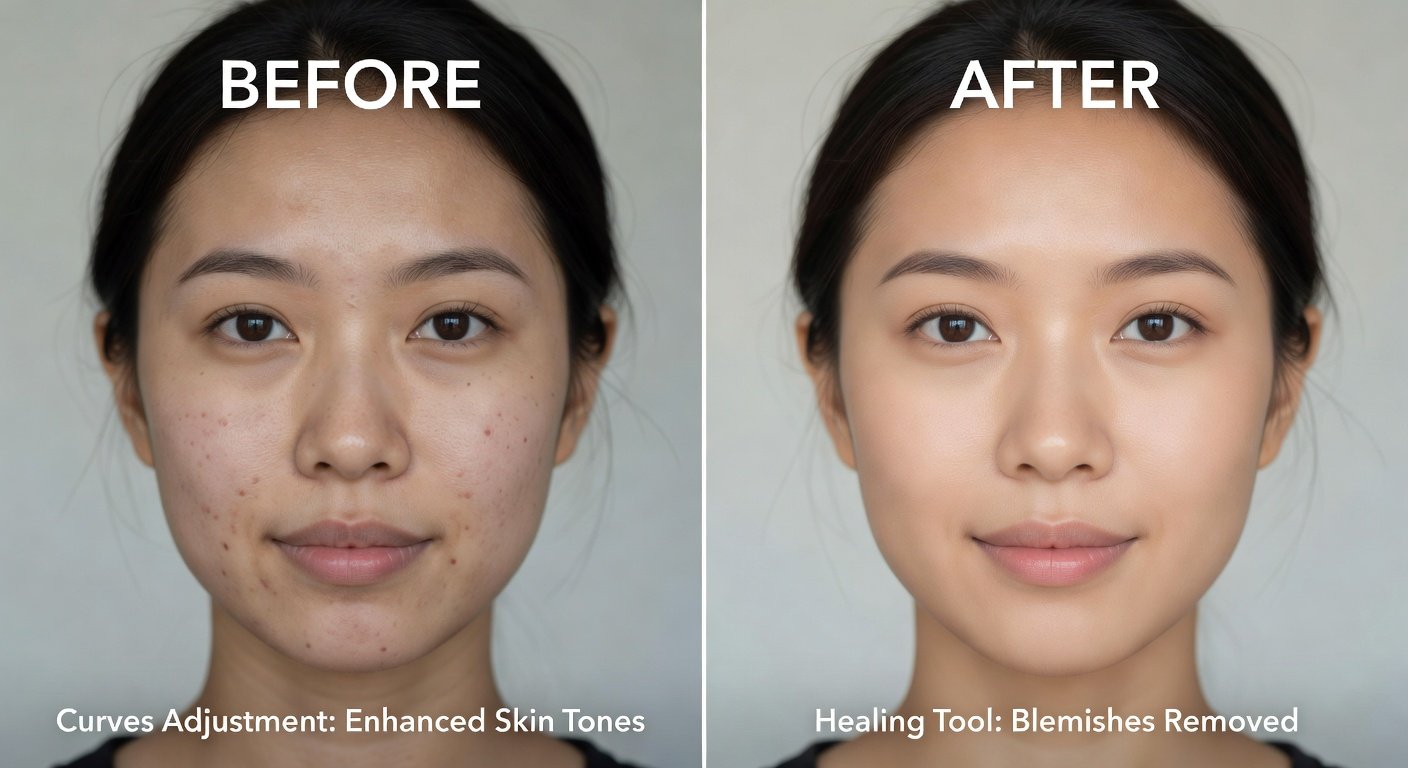
Healing Tool: Removing Imperfections Seamlessly
The Healing brush intelligently fills selected areas using surrounding pixels. It's ideal for cleaning up dust spots, power lines, or photobombers in travel shots. Zoom in for accuracy, brush over the unwanted element, and adjust the size and hardness for natural results. Combine with the Clone tool for more complex repairs where direct healing may not suffice. Practice on test images to understand how the algorithm samples nearby textures, particularly in areas with repeating patterns like foliage or brick walls.
Selective Adjustments for Targeted Edits
Selective lets you brush adjustments onto specific regions. Choose from brightness, contrast, saturation, or warmth, then paint the effect with adjustable brush size and feathering. This technique shines for portraits: brighten eyes, enhance skin tones selectively, or deepen background colors to create depth. Practice on sample images to master brush control and avoid harsh transitions. For street photography, use Selective to emphasize a subject's clothing while muting distracting background elements, resulting in stronger visual focus.
Comparing Snapseed to Built-in Phone Editors
Built-in editors on iOS and Android offer quick fixes like auto-enhance and basic filters. However, Snapseed provides advanced non-destructive editing layers and RAW support that native apps lack. Users gain finer control over details without switching to desktop software. For instance, while iOS Photos app handles simple crops efficiently, Snapseed's Perspective tool corrects converging lines in architectural images far more accurately. Android users benefit from Snapseed's integration with Google Photos library, enabling seamless workflow between capture and editing.
Batch Processing and Exporting Optimized Files
While Snapseed does not support full batch editing natively, you can apply saved looks or styles across multiple images efficiently. For true batch workflows, edit one photo, save the style, then apply it sequentially. Export settings allow control over resolution, quality, and file format. Choose high-quality JPEG or lossless formats depending on your end use. Always preview on different screens before final export to ensure colors remain consistent across devices and platforms.
Beginner Pitfalls and How to Avoid Them
- Over-editing saturation leading to unnatural colors – use subtle adjustments and compare with the original frequently.
- Ignoring RAW files on compatible cameras – enable RAW support for maximum dynamic range in post-processing.
- Forgetting to save versions – duplicate images before heavy edits to preserve originals for future revisions.
- Neglecting to calibrate your screen brightness – this can lead to overly dark or bright edits that look poor when viewed elsewhere.
Advanced Creative Effects
Explore double exposure, grunge textures, and lens blur for artistic results. Combine with the Black & White tool and add subtle vignettes to direct viewer attention. Experiment with portrait mode images for professional-looking bokeh effects. Try applying the Drama filter followed by selective color pops to create striking images for social media campaigns or personal projects.
Genre-Specific Editing Tips
For landscape photography, prioritize Curves and the Healing tool to remove sensor dust while maintaining natural gradients. Portrait sessions benefit greatly from Selective adjustments around the face and eyes. Street photographers can use the Brush tool to dodge and burn specific areas, adding mood without complex layers. These targeted approaches help build a consistent editing style over time.
FAQ
Does Snapseed support filters in 2026?
Yes, the app includes a wide range of filters and styles that can be customized and stacked for unique looks across various genres.
Is RAW support available on all devices?
RAW editing works on most modern smartphones from 2024 onward, including recent iPhone and flagship Android models with compatible camera apps.
Is Snapseed compatible with 2026 devices?
The app receives regular updates ensuring full compatibility with the latest iOS and Android versions as of 2026, including foldable screens and high-refresh-rate displays.
For more details on mobile photography tools, visit Google or explore resources at Google Play and Apple.
Conclusion
Snapseed empowers mobile users with pro-level editing capabilities in 2026. By mastering curves, healing, and selective tools while following best practices for batch workflows and exports, you can achieve consistent, high-quality results. Practice regularly and build your skills progressively to transform everyday photos into stunning visuals that stand out in any collection.
No comments yet. Be the first!